

 Yamagara Knits


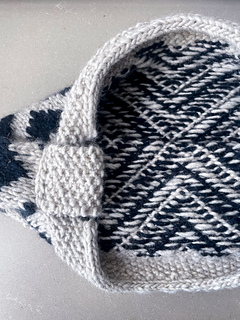


ZZ Bag
Felt like you need a bag that is as cosy as your sweater?
ZZ Bag packs much fun with skills beyond knitting
— stranded colourwork, felting, hand-stitching a zipper and adding a strap
The pattern is available in English and French. Both files are included in your download.
BUNDLE SALE
10% off ZZ Bag and A Chic Scarf pattern. Put both patterns in your cart and apply the promo code ZZACS10 before checking out.
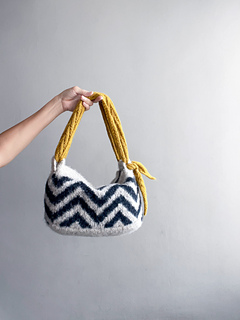
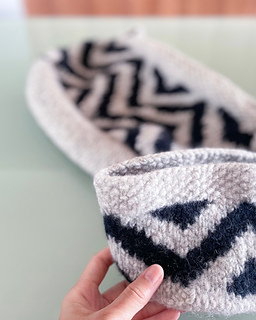
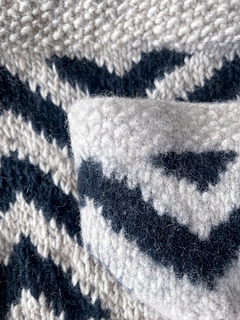
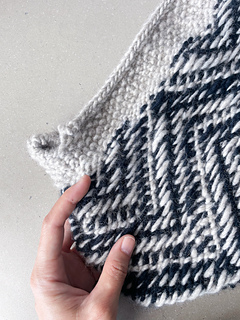
ZZ Bag takes cozy to the next level. It’s not just about knitting—it’s a creative adventure! You’ll dive into stranded colourwork, explore felting techniques, hand-stitch a zipper, and finish off with adding a strap. Clear diagrams and photo tutorials guide you through key steps. Colourwork charts (care has been taken for jogless patterning in the round) are marked with positions to trap floats to help you achieve a neat finishing on the inside of the bag as well. It’s perfect for you if you would like to level up your knitting skills while crafting a bag that is as cosy as your sweater.
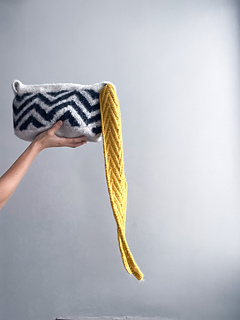
You can use a store-bought shoulder strap, repurpose a strap from an old bag, or use a scarf, such as a narrow silk scarf, for the strap. If you would like everything about your bag to be knitted by yourself, consider knitting A Chic Scarf. A Chic Scarf is designed to complement the ZZ Bag. Not only is it a stylish accessory on its own, its i-cord edging reinforces and stabilizes the scarf to prevent overstretching, especially when used as a strap. The stitch pattern mirrors ZZ Bag’s zigzag pattern, and the narrow tips create a lovely knot when tied.
FINISHED MEASUREMENTS
Excluding measurement of strap:
Before felting
Base: 15 cm / 6” (width) x 30 cm / 12” (length)
Height: 23.5 cm / 9¼”
After felting
Base: 12 cm / 4¾” (width) x 24 cm / 9½” (length)
Height: 18.5 cm / 7¼”
The sample has a shrinkage of 20-22% after felting. Your bag may felt to a different size depending on the amount of shrinkage.
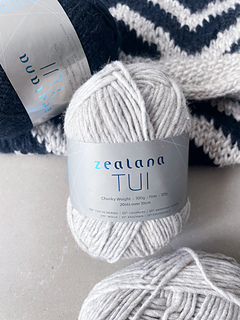
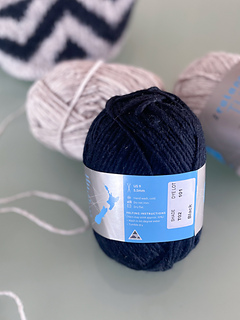
YARN
Aran weight
Zealana Tui Chunky Weight (111 m / 121 yards per 100 g, 70% fine NZ merino, 15% cashmere, 15% brushtail possum)
Sample colours:
MC T01 Natural
CC T02 Black
Choose a non-superwash yarn that is pure animal fibre, such as wool or alpaca. Yarns that have a blend of animal fibre with a plant or synthetic fibre may not felt easily. Certain yarn constructions may felt more successfully than others. The best way to find out if a yarn will felt to your desired result is to knit a test swatch and put it through the felting process.
YARDAGE
MC 180 m / 197 yards
CC 110 m / 120 yards
NEEDLE
One 4.5 mm / US 7, 40 cm / 16” or longer circular needle
One 5 mm / US 8, 40 cm / 16” or longer circular needle
One 5.5 mm / US 9, 40 cm / 16” or longer circular needle
Two 5.5 mm DPNs for working box pleats
GAUGE (before felting)
16 sts and 16 rows = 10 cm / 4” in stranded colourwork with 5.5 mm / US 9 needle
Gauge is not crucial to this project but if you are working with a shrinkage rate of 20-22% similar to the sample, a higher gauge (more sts and rows in 10 cm / 4”) will produce a smaller bag.
FELTING AND SHAPING TIPS
Felting tips are provided in the pattern. Felting can be done by hand (you will need patience!) or using your washing machine. A top load washing machine allows you to stop, check and re-start the felting process more easily than a front load washing machine, but success can also be achieved using a front load washing machine. The sample was felted using a front load washing machine.
The yarn used in the sample is Zealana Tui Chunky. The yarn label says to wash in 60 degree celcius water and tumble dry. As results vary with the washing machine among various other factors, I made a small bag as a swatch and test piece. Based on my experience with my swatch, I did the felting in my front load washing machine in a non-stop 1-hour cycle with 90 degree celsius water and old towels. Instead of putting the bag in the dryer as suggested on the yarn label, I removed as much water from the bag as possible, shaped the bag with stuffing and let it dry with the stuffing in an airy place.
All the test knitters have been able to felt their bags to an extend that they like, using various yarns and felting process. A few of them have written notes on their felting and shaping process. Please visit their project pages and have them as reference.
Unlike feting a project that needs to fit, such as slippers and mittens, felting a bag does not require too much fine-tuning in size. It is a great introduction to the art of felting your knitted work.
NOTIONS
Tapestry needle for weaving in ends, sewing needle and threads: one matching the MC yarn, one to match the zipper, and a contrasting colour for basting, a zipper. Tips are provided in the pattern on how to choose the right zipper.
STRAP
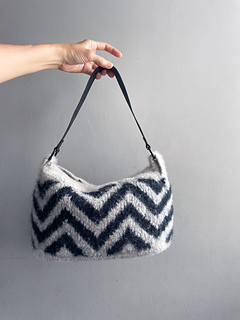
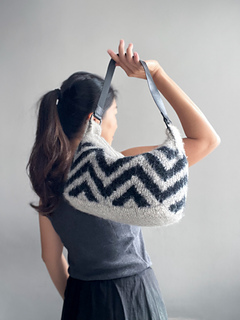
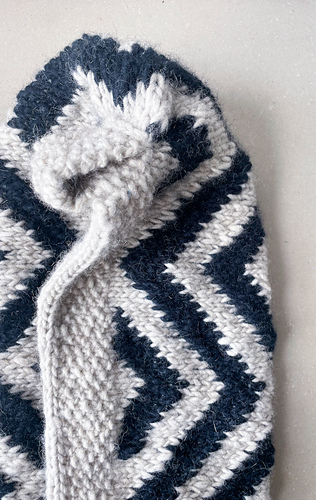
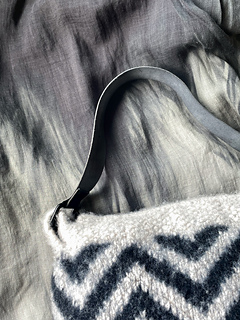
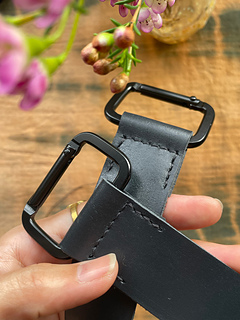
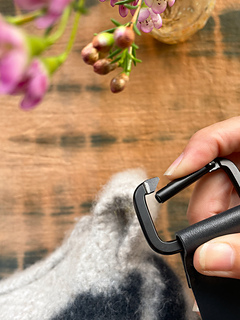
The sample uses a leather strap (length 50 cm / 19.5”, width 3 cm / 1¼”), hand-stitched onto a pair of rectangle shaped carabiners ( 5 cm x 3 cm / 2” x 1¼”). Instructions on hand-stitching the leather strap are not provided in the pattern, but process pictures have been shared here.
Alternative options are discussed and detailed in the pattern, such as tying a scarf or attaching D rings and using a strap with clips. This can be store-bought or repurposed from an old bag.
NOTES AND TECHNIQUES
Begin the bag by working the base in garter stitch, then picking up stitches around the base for the sides. Work the sides in the round following the colourwork charts, then work box pleats and seed stitch around the top of the bag. Stitches are divided to work the top edges of the bag, finished in i-cord, and the flaps that hold the shoulder strap. After the bag is felted, stitch the flaps to make 2 loops for the shoulder strap. Sew zipper, following photo tutorial and stitching tips in the instructions.
TAG
Enjoy your ZZ bag! We would love to see your work.
Please share pictures with the hashtag #zzbagbyyamagara
SPECIAL THANKS
Deep gratitude to a team of kind and committed test knitters who offered their time and resources to work through the pattern to make sure that it is as clear and error-free as possible: Roberta. Marie, Qiu Fang, Marianne, Sonoka, Pernilla, Kerstin, Sandrine, Sanae, Amy, Andi, Laura, Yuki, Cheryl, Lindi and Helene.
Pattern in French translated by Sandrine Maurice. Special thanks to Sandrine.
Le sac ZZ de Yamagara fait passer le confort à un niveau supérieur. Ce n’est pas seulement du tricot, c’est une véritable aventure creative qui vous attend ! Vous allez plonger dans le jacquard en chevrons colorés, explorer les techniques de feutrage, coudre une fermeture éclair à la main et terminer en ajoutant une sangle. Des diagrammes clairs et des tutoriels photo vous guideront étape par étape. Les diagrammes de jacquards sont expliqués avec des positions pour bloquer les fils libres afin d’obtenir une finition soignée à l’interieur du sac également. Ce sac est le modèle ideal si vous souhaitez perfectionner vos compétences en tricot tout en confectionnant un sac aussi douillet et confortable qu’un pull.
Vous pouvez utiliser une bandoulière achetée dans le commerce, réutiliser la sangle d’un ancien sac ou encore utiliser un foulard, par exemple, un foulard en soie étroit, pour la bandoulière. Si vous souhaitez que toutes les pièces de votre sac soient tricotées par vous-même, alors vous pouvez envisager de tricoter A Chic Scarf de Yamagara. A Chic Scarf est conçue pour compléter le ZZ Bag. Non seulement c’est un accessoire élégant en soi, mais son bord en i-cord renforce et stabilise l’echarpe pour éviter qu’elle ne s’étire, surtout lorsqu’elle est utilisée comme sangle. Le motif de maille croisées copie le motif en zigzag du ZZ Bag, et les extrémités étroites permettent de faire un joli nœud pour attacher l’étole au sac.
DIMENSIONS FINALES
Sans compter la bandoulière:
Avant feutrage :
Base: 15 cm / 6” (largeur) x 30 cm / 12”(longueur) Hauteur: 23.5 cm / 9¼”
Après feutrage:
Base: 12 cm / 4¾” (largeur) x 24 cm / 9½” (longueur)
Hauteur: 18.5 cm / 7¼”
L’échantillon a rétréci de 20 à 22 % après le feutrage. La taille finale de votre sac peut varier en fonction du taux de rétrécissement.
FIL RECOMMANDE
Fil de catégorie Aran
Zealana Tui Chunky (111 m / 121 yards pour 100 g, 70% merinos fin de Nouvelle-Zélande, 15% cashemire, 15% opossum)
Couleur du prototype: MC T01 Naturel
CC T02 Noir
FIL SUGGERE
Mode Chunky Wool de Rowan (100 m / 109 yds pour 100 g, 100% laine)
Choisissez un fil non superwash composé uniquement de fibres animales, comme la laine ou l’alpaga. Les fils contenant un mélange de fibres animales avec des fibres végétales ou synthétiques peuvent ne pas feutrer aussi facilement. Certaines constructions de fils feutrent mieux que d’autres. La meilleure façon de savoir si un fil feutrera selon votre souhait est de tricoter un échantillon et de lui appliquer le processus de feutrage.
METRAGE
Couleur principale 180 m / 197 yards
Couleur secondaire 110 m / 120 yards
AIGUILLES
- aiguille circulaire 4.5 mm / US 7, 40 cm / 16” ou plus
- aiguille circulaire 5 mm / US 8, 40 cm / 16” ou plus
- aiguille circulaire 5.5 mm / US 9, 40 cm / 16” ou plus
- deux aiguilles doubles pointes 5.5 mm pour travailler les plis creux
ECHANTILLON (avant feutrage)
16 m and 16 rgs = 10 cm / 4” en jacquard chevrons avec les aig. 5.5 mm / US 9
L’échantillon n’est pas crucial pour ce projet, mais si vous travaillez avec un taux de rétrécissement de 20 à 22 % similaire à celui de l’échantillon, une tension plus élevée (plus de mailles et de rangs sur 10 cm / 4”) donnera un sac plus petit.
NOTES ET TECHNIQUES
Commencez le sac en travaillant la base au point mousse, puis en relevant des mailles autour de la base pour les côtés. Tricotez les côtés en circulaire en suivant les diagrammes, puis travaillez les plis creux et le point de riz pour le haut du sac. Les points sont séparés pour travailler les bords supérieurs du sac, les finitions sont en i-cord, et enfin tricotez les rabats qui retiennent la bandoulière. Une fois le sac feutré, cousez les rabats pour faire deux boucles pour la bandoulière. Cousez la fermeture à glissière, en suivant le tutoriel photo et les conseils de couture figurant dans les instructions.
257 projects
stashed 222 times


