patterns >  Kirsten Holloway Designs and 1 more...
> Written On My Heart Crossbody Bag


Written On My Heart Crossbody Bag
A free version is also available.
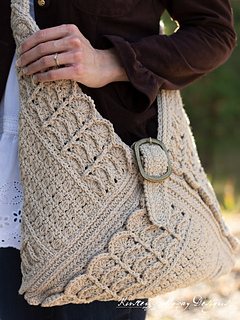
A pretty crossbody bag that works as well for the beach as it does a weekend in the mountains.
This crochet pattern is available for free on my website or you can download it here as a print-optimized, ad-free PDF for your convenience.
Materials Needed:
3.25mm hook (bag straps and handles only)
4mm (G) hook (bag straps and handles only)
5mm (H) hook, or hook needed to obtain gauge
Approximately 720-740 yards Lily Sugar ‘n Cream cotton yarn in “Jute”
1 1/2” antique brass buckle
2 1 1/2″ antique brass rectangles
Yarn needle
Scissors
18″ 4.5mm natural cotton cord
2 ft thin twine
Stitch markers
Large safety pins
(Optional) 1 yd calico or flowered fabric to line bag.
Stitches Used:
sl st = slip stitch
ch = chain
sc = single crochet
hdc = half double crochet
dc = double crochet
2dc cluster – dc2tog worked in same st (straps and handles)
3dc cluster = dc3tog worked in same st (body of the bag)
BPhdc = back post half double crochet
BPdc = back post double crochet
BPtr = back post treble crochet
FPsc = front post single crochet
FPhdc = front post half double crochet
FPdc = front post double crochet
rsc = reverse single crochet (crab stitch)
Additional Terms:
hdc in the 3rd loop = Look at the top of the stitch, and locate the sideways “V”, bend the stitch to look at the back, and you should see another “V”. You’ll be working into the back loop of that “V”, this is called the 3rd loop.
Back bar of sc – Instructions: Look at the back of the stitch and locate the short bar that runs horizontal. Work all stitches for that section into this bar.
sp/sps = space/spaces
st/sts = stitch/stitches
prev = previous
Measurements:
Bag is 17″ wide, by 18″ tall at tallest point (excluding shoulder strap), by 8″ deep at shallowest point.
Additional Notes:
-ch-1 at beginning or ending of row does not count as a st.
-ch-3 at end of row counts as a dc stitch.
-I’ve written a lot of notes on this and shared several tutorial pictures in the pattern itself. Please look over the pattern in its entirety before you begin.
-The PDF contains a tutorial on how to finish the ends of a cotton rope so it does not fray.
162166 projects
stashed
89644 times
- First published: October 2022
- Page created: October 10, 2022
- Last updated: April 1, 2025 …
- visits in the last 24 hours
- visitors right now


