

 I Like Crochet, June 2021


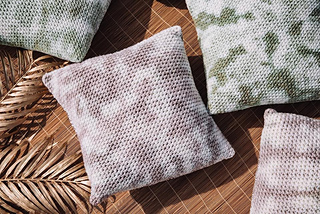


Tie Dye Lagoon Pillows
Update your home décor with these trendy, tie-dyed pillows. Using only simple household supplies, you can dye your own unique pillows in an hour or less. Can you believe all these pillows were dyed using the same black food coloring? Differences in the final result were achieved through several tie-dying techniques and the use of two different yarns: 100% superwash wool and an acrylic/wool blend. Food dyes react with any animal fibers and having a blend of animal and man-made fibers can give a different color saturation or a slightly different hue to the finished product. Experiment with different dyes or yarn choices to create a unique, custom palette for your home.
Time: Weekend Project
Skill Level: Adventurous Beginner
Size: 16” square.
Gauge: Gauge is not essential for this project.
MATERIALS
Yarn: Cascade Yarns 220 Superwash (100% Merino; 150 yards 137 meters/100 grams): 817 Aran ( A, 4 balls)
Cascade Yarns Pacific Solids (60% acrylic, 40% Merino; 213 yards 195 meters/100 grams): 01 Cream (B, 4 balls)
Hook: US size G/6 (4 mm) – US size H/8 (5 mm)
Notions: Tapestry needle, tape measure, scissors, fiber fill or pillow forms.
Additional supplies: Vinegar, food coloring (McCormick’s Black), baker’s twine, microwave-safe dish, plastic wrap, upholstery fabric for backing (optional).
Pattern Notes
Pillow covers are crochet in square panels, using linen stitch pattern, in a corner-to-corner direction. This allows you to adjust the cover size to fit any square pillow. Simply work the initial Increase Row until 2 sides of the triangle are desired length, before beginning to work the Decrease Row. After completing the panels, the covers are tie-dyed using food coloring. You could either make one pillow from 2 panels by sewing the panels together, or a set of 2 pillows, by adding a fabric backing to each. Basic sewing skills and a sewing machine would be helpful for making a fabric backing, with an envelope opening.
147493 projects
stashed 80291 times
12216 projects
stashed 7431 times


