

 Lady in Yarn
Motley 2
EN
I love brioche. I love how brioche can turn even the simplest projects into breathtaking pieces of art. I warmly invite you to explore brioche with me.
The size of your shawl and the yarn colors are entirely up to you. You can finish the shawl at any point, but the moment you choose to stop will influence the final shape and appearance.
And one more thing! Brioche may seem difficult if you haven’t tried it before, but that’s just an illusion— if you can knit, purl, and work yarn overs, you can knit brioche too.
Yarn Used
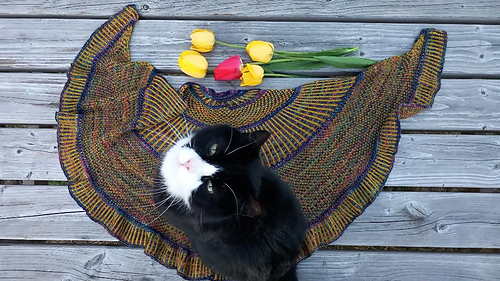
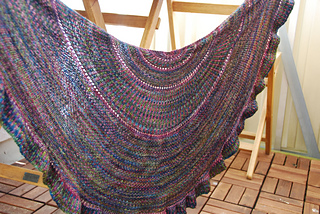
Shawl 1: Malabrigo Mechita in the colors Musas and Ninfas, 3.5 oz / 420 yds (100 g / 384 m)
Needles: US 4 (3.5mm)
Yardage: 1 skein of each color
Wingspan: 49 in (122 cm)
Depth: 19.75 in (50 cm)
Shape: crescent
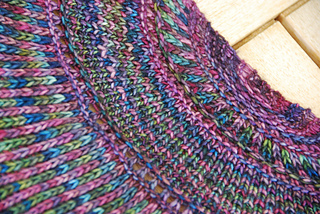
Gauge (Stockinette brioche): 26 rows & 18 sts over 10cm / 4 in.
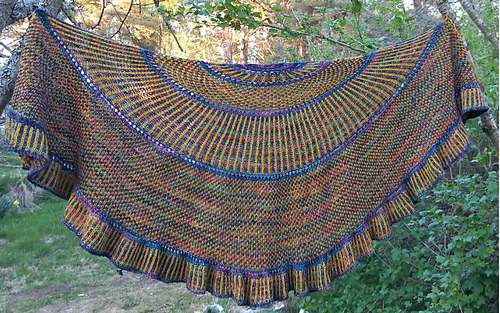
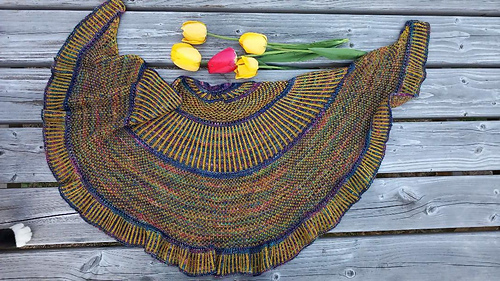
Shawl 2: Malabrigo Sock – 1 skein in color 722 Fortaleza, Malabrigo Ultimate Sock – 1 skein in color 035 Frank Ochre
Needles: US 4 (3.5mm)
Yardage: 1 skein of each color
Wingspan: 47.25 in (120 cm)
Depth: 17.75 in (45 cm)
Shape: crescent
Gauge (Stockinette brioche): 28 rows & 20 sts over 10cm / 4 in.
The gauge measurements provided are approximate due to the shawl’s pi-shawl construction. Between increase rounds, the stitch count remains the same while the circumference gradually increases. As a result, some rows are stretched more during blocking than others, which may affect the measured gauge.
Gauge is not critical for this project and swatching is not required. However, your gauge will affect both the finished size of the shawl and the amount of yarn used.
Yarn
You can choose any yarn for this shawl. A typical choice would be a lightweight shawl yarn, but you can also use a thicker yarn. Keep in mind that this will affect the total yardage required, but the shawl itself will work just as well.
Needles
For this shawl, choose needles appropriate for your selected yarn. Some knitters recommend using smaller needles for brioche, but I do not suggest that. Instead, select the needle size you would normally use for the yarn—as if you were not working brioche.
While shawls are often worked on larger needles, and I personally frequently knit brioche rib shawls on larger needles, for this pattern I recommend staying with needle sizes that match your yarn.
The needles must be circular (with a cable connecting both tips), so that when changing colors you can slide your work to the other end of the needle and begin again from the same side.
Techniques Used
• This shawl is based on Elizabeth Zimmermann’s Pi Shawl method.
• The shawl begins with a long-tail cast-on or any other cast-on method, as elasticity is not important here. The cast-on edge is seamed at the end.
Shawl Shape
The shawl can be worked as either a semicircle or a crescent shape. The pattern provides the number of rows needed to achieve the intended shape.
For a crescent shape, you can further adjust the number of rows to make the shawl more or less curved. The general rule is: the fewer rows you work between increase rows, the deeper the crescent shape will become.
However, exceeding the number of rows given for the semicircular version may result in a shape that does not behave as intended—forming more of a flared “fan” instead.
You can also begin with a semicircular shape and transition into a crescent shape in later sections.
Possible Variations:
• semicircular shawl
• crescent shawl
• start as semicircular, then transition to a crescent shape at any point
Important! Do not start with a crescent shape and then switch to a semicircular shape, as this will result in a structural error in the shawl.
PL
Uwielbiam brioszkę. Uwielbiam w jaki sposób brioszka zamienia nawet te najprostsze prace w zapierającą dech w piersiach sztukę. Zapraszam serdecznie do eksploracji brioszki.
Wielkość szala i kolory włóczek całkowicie zależą od Ciebie. Szal można zakończyć w dowolnym momencie, ale moment zakończenia może dawać różny efekt.
I na koniec! Brioszka może wydawać się trudna dla kogoś, kto jeszcze nie miał z nią styczności, ale to tylko takie wrażenie, jeżeli potrafisz dziergać prawe i lewe oczka oraz narzuty – potrafisz też dziergać brioszkę.
Wykorzystana włóczka
Szal 1: Malabrigo Mechita w kolorach Musas i Ninfas, 100g/384m
Druty: 3.5 mm
Zużycie: po 1 motku
Rozpiętość: 122 cm
Głębokość: 50 cm
Kształt: księżyc
Próbka rozliczeniowa (brioszka gładka): 26 rzędów i 18 oczek w kwadracie 10cm x 10cm
Szal 2: Malabrigo Sock 1 motek w kolorze 722 Fortaleza, Malabrigo Ultimate Sock 1 motek w kolorze 035 Frank Ochre
Druty: 3.5 mm
Zużycie: po 1 motku
Rozpiętość: 120 cm
Głębokość: 45 cm
Kształt: księżyc
Próbka rozliczeniowa (brioszka gładka): 28 rzędów i 20 oczek w kwadracie 10cm x 10cm
Podane próbki są orientacyjne ze względu na konstrukcję szala, która sprawia, że początkowe rzędy w danej sekcji są mniej rozciągane przy blokowaniu niż te znajdujące się na końcu sekcji.
Próbka rozliczeniowa nie jest istotna dla tego projektu i nie jest wymagana, jednakże wpływa ona na rozmiar szala i zużycie włóczki.
Włóczka
Włóczkę do szala dobierasz dowolnie, może to być typowa włóczka na szale, czyli cienka, ale może również być grubsza, wtedy zmieni się ilość włóczki, której będziesz potrzebować na ten szal, ale sam szal wyjdzie równie dobrze.
Przybory: druty na żyłce 60-80cm, igła do wełny do wszywania końcówek oraz zakończenia szala.
Do szala potrzebujesz drutów dopasowanych do wcześniej wybranej włóczki. Niektórzy zalecają aby druty do brioszki dobierać mniejsze, według mnie nie należy tak robić. Dobierz druty dopasowane do włóczki, czyli takie jakie byś dobrała, gdyby to nie była brioszka. Do szali zwykle dobiera się druty większe i ja sama często dziergam szale brioszkowe dziergane ściegiem ściągaczowym brioszkowym na większych drutach dla tego wzoru jednak proponuję pozostać przy drutach dopasowanych do włóczki. Dodatkowo druty te muszą być na żyłce (dwustronnie zakończone), tak aby przy zmianie koloru można było przesunąć robótkę na drugi koniec drutu i rozpocząć ponownie robótkę z tego samego końca.
Użyte techniki
• Szal powstał według metody Elizabeth Zimmermann na okrągły szal: Pi shawl.
• Rozpoczęcie szala metodą Long-tail cast on lub dowolnie inną, ze względu na to, że nie ma tutaj znaczenia elastyczność nabierania oczek. Na koniec te oczka zszywamy.
Kształt szala
Kształt może być półokrągły lub księżyc (aniołkujący). We wzorze podana jest ilość rzędów, aby osiągnąć odpowiedni kształt. Przy kształcie księżyca dodatkowo można dostosowywać ilość rzędów tak, aby kształt był bardziej zbliżony do półokręgu lub mniej. Generalna zasada jest taka, iż im mniej powtórzeń zrobimy przed kolejnym zwiększeniem oczek, tym szal będzie bardziej aniołkował. Przekroczenie jednak ilości rzędów podanych w części dotyczącej na półokrągły kształ grozi otrzymaniem kształtu nie spełniającego naszych wymagań, czyli wachlarz. Możesz również zacząć od szala półokrągłego, a zakończyć na kilku sekcjach księżyca.
Możliwe kombinacje:
- szal półokrągły
- szal w kształcie księżyca
- rozpoczęcie kształtem półokrągłym, potem przejście do księżyca (w dowolnym momencie).
Uwaga, nie rozpoczynaj od kształtu księżyca aby potem przełączyć się na półokrągły, gdyż to sprawi błąd w konstrukcji.
146604 projects
stashed 110950 times
29450 projects
stashed 28358 times
10291 projects
stashed 9406 times


