patterns >  YARNutopia on Ravelry
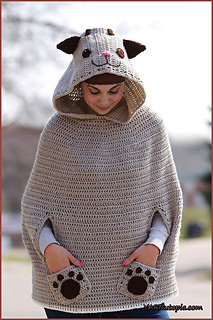
> Kitty Cat Crochet Poncho


Kitty Cat Crochet Poncho
There is a FREE Version of this written pattern and video tutorial on YARNutopia.com.
FREE VERSION: http://wp.me/p5YnRt-PT
I do not allow printing on my website, so if you’d like to print it, I am offering the PDF file for a small charge here on Ravelry.
You can always contact me via Facebook if you have any problems with the pattern. I am happy to help if you have any questions along the way.
These patterns are copyright YARNutopia © so PLEASE DO NOT COPY, SHARE, ADJUST OR RESELL MY PATTERN. I wrote and tested this pattern myself, from beginning to end. It took a lot of time and work, and I would really like to have it remain “my pattern.”
You can sell anything you make from my patterns, please just link back to my website YARNutopia.com. Thank you!
Teacher: Nadia Fuad
Video and Editing: Fuad Azmat (My Daddy)
Share your work on Facebook!
Add me on Snapchat: YARNutopia
Follow me on Instagram
Visit My Ravelry Store and add this to your Favorites!
Follow me on Twitter: @YARNutopia
Enjoy this video and subscribe to my channel on YouTube for more tutorials on how to crochet!
Leave a comment, and share with your friends!
Designed by Nadia Fuad
You may sell items made from my pattern, but please reference my website YARNutopia.com.
Please do not copy, sell, and/or post this pattern and claim it as your own.
Materials:
-Red Heart Yarns Super Saver in Oatmeal (1,090 yards--I bought 3 skeins)
-Red Heart Yarns Super Saver in Coffee (120 yards)
-Red Heart Yarns Super Saver in Soft White (10 yards)
-Red Heart Yarns Super Saver in Perfect Pink (1 yard)
-I-5.50mm Crochet Hook (Find the hook I used in my video tutorial here!)
-Polyfil (to stuff the tail)
-Stitch Markers
-Yarn Needle
-Scissors
NOTES:
-This project uses 1,220 yards of yarn. I am making the size Small/Medium. Keep reading to learn how to make this smaller or bigger.
-Use a smaller hook to make these smaller
-Use a bigger hook to make these bigger
-Watch the FULL video tutorial for visual instructions for each round and tips on how to make this smaller and bigger.
-Weave in all the ends as you go so you don’t have to weave them all in at the very end.
-Your starting chain should be any multiple of 5 (I start with 75, you can start with 65, 75, 85, 95), Round 2 increases 5 stitches evenly. Rounds 3, 4, 5, 6, 7, 8, 9, and 10 increase by 10 stitches evenly each round. If you need to increase more, you can continue with the established pattern of increases and then go onto the instructions for the front of the poncho and the back of the poncho to create the front slits.
-If you want to make this smaller, stop increasing at any round (maybe round 5 or 6 so you have about 120 sts), then go onto instructions on making the front and back of the poncho.
-TURN YOUR WORK FOR EACH ROW!!!
-If the instructions above are confusing, please message me on Facebook, and I will answer any questions you may have. Please be specific in your questions. Thank you!!
-The measurements for this poncho are as follows: Tail: 9 inches (22.86 cm), slits in the front: 10 inches around (25.4cm), Shoulder to bottom: 27 inches (68.58cm), Across shoulders: 17 inches (43.18cm), Hood length: 16 inches (40.64cm), Waist: 48 inches around (121.92cm), Hips: 50 inches around (127 cm), Pockets: 4 inches deep (10.16cm)
-Please know you can make this bigger or smaller with very few mathematical changes.
Special stitches:
Ch(s): chain(s)
YO: Yarn Over
St(s): Stitch(es)
BLO: Back Loops Only
prev.: Previous
Sl st: slip stitch
SC: Single Crochet
DC: Double Crochet
328391 projects
stashed
113763 times
- First published: April 2017
- Page created: April 8, 2017
- Last updated: October 2, 2024 …
- visits in the last 24 hours
- visitors right now


