

 EyeLoveKnots Website
 Pattern


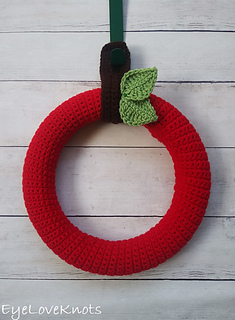
Easy Apple Wreath
 also available for free:
info in notes
also available for free:
info in notes

A free version is also available.
buy it now or visit pattern website

How to crochet an easy and simple apple themed wreath perfect as Fall, classroom and Farmhouse decor. It even works for a kids room or baby shower that is farm themed!
Video tutorial included.
Materials:
- 225 Yards of Worsted Weight Yarn
- H8/5mm Crochet Hook
- Tapestry Needle
- Tape Measure (gauge is essential)
- Optional, Stitch Markers
- Optional, Jewelry Pliers
- 12” Styrofoam Wreath Base
- Glue or Sewing Pins
Material Notes:
I used Red Heart’s Super Saver in Cherry Red 192 Yards (cover), Coffee 11 Yards (hanger), and a small amount of Tea Leaf (leaves).
My favorite yarns for crocheting a wreath are going to be 100% acrylic yarns, but specifically, I like Premier Yarns Basix Worsted, Lion Brand Pound of Love and Red Heart Super Saver. These yarns hold up well to wear and tear, and while they will fade over time, I feel that these yarns hold their color the best over other yarns I’ve tried, as well as the shaping of embellishments. If the wreath will be inside only, you could go with cotton blends and embellishments, but for outdoor wreaths, cottons fade quickly and begin to fall apart.
Stitch Markers are helpful to line up the rows of the wreath form cover and hold them together while you sew the cover on.
Weaving in the ends of a tough yarn or through tight stitch stitches can be hard on the fingers. Sore thumbs and frustration can be a thing of the past by simply using jewelry pliers to carefully help pull the tapestry needle through the work.
Styrofoam wreath form bases come in green and white. It does not particularly matter which color you use for a crocheted wreath that is made of a solid fabric. Even as it stretches, the fabric is typically still solid enough that you don’t see your stitches through, but this is not always true so you will definitely want to test it before whipstitching closed. Personally, I always try to match light colored yarns with a white base, and darker colored yarns with a green base just so I don’t have to worry about it.
Styrofoam wreath bases can be found in a variety of stores and online, but if you don’t have one, you could use a straw wreath or a pool noodle with the two ends attached together with a strong tape. These tend to be thicker so you may need to add stitches to the beginning chain to get a wider fabric. While I have not tested wire wreath forms, I think they would work about the same, but may be thinner around and require less stitches.
Originally, the plan was to glue the leaves to the wreath hanger, but I was using some sewing pins to map out where I wanted the leaves to be, and I fell in love with the look. I also like the idea of the leaves being removable so I can easily use the wreath form base and hanger again. If I were going to sell this wreath or gift it, I would definitely have glued the leaves in place.
1 3/4” long size 45mm sewing pins is what I used to pin the leaves in place (instead of glue). 45mm is a sturdy pin and 1 3/4″ is a good length to reach the styrofoam.
Hot glue works well for several years, but it can look a little messy, especially if it’s hot where you are, and the embellishments start to loosen over time. I prefer using Titebond Quick and Thick Multi-Surface to glue embellishments in place.
Time Spent:
This wreath came together in around two and a half hours.
Gauge (width gauge is essential):
20 SC by 14 Rows = 6 1/8” Wide by 3 7/8” Tall
Abbreviations (US Terms):
- SC - Single Crochet
- HDC - Half Double Crochet
- DC - Double Crochet
- TR - Treble Crochet (Explained)
- DTR - Double Treble Crochet (Explained)
Do you offer free patterns and PDFs?
Yes! Head over to my EyeLoveKnots blog where you’ll find hundreds of free crochet patterns INCLUDING this one. You can view the free crochet only from my blog at any time, or subscribe to my blog to download the free PDF of this pattern via the Free File Library – you’ll find the tab on the top menu. The library is password protected so sign up for my newsletter and you’ll receive a Welcome email containing this month’s password. From the library, you’ll be able to access the PDFs via Google Drive – you do not need to have a Google Drive account to view and download the PDF. I earn my income from the views my blog sees, but if you’d rather not subscribe, I completely understand and appreciate your support here on Ravelry! I also share free crochet patterns on my Cre8tion Crochet and Yarn Crafts and Coffee blogs.
About Your Instant Digital Purchase:
This is an 5 page PDF containing written instructions and 2 photos - the title image on page 1 and 1 page at the end with a photo tutorial showing the assembly of the wreath form cover.
This digital purchase is instant. As soon as your payment processes, you have instant access to the pattern. You are only receiving access to a PDF. You will not receive a physical pattern via snail mail, and you will not receive an email with the PDF. You will need to go to your Library, and download the PDF yourself.
Digital Purchases are FINAL sale - Due to their digital nature they cannot be returned or refunded.
Copyright 2021 (Updated 2026) - All EyeLoveKnots Patterns, Photos and PDF’s are protected under copyright. They are not to be copied, distributed or sold - doing so is copyright infringement and stealing! DO NOT link to the PDF Download link, rather linking should be done from blog post or shop link. Feel free to use this information to make and sell your own items. Designer credit - Alexandra of EyeLoveKnots - is very much appreciated, but not required. DO NOT use my photos in selling your own products!
Updates:
- 2026: Stitch counts haven’t changed, but complete overhaul adding more details in each category and updating the format.


 Ravelry download


 Cancel
also available for free:
info in notes
Cancel
also available for free:
info in notes


286420 projects
stashed 116103 times
 stashed