

 What Lydia Made Ravelry Store
Clamber Cardigan
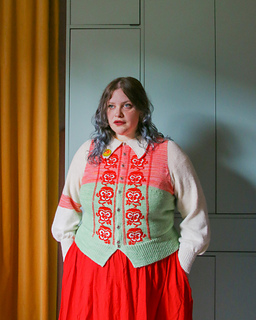
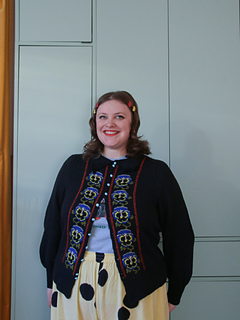
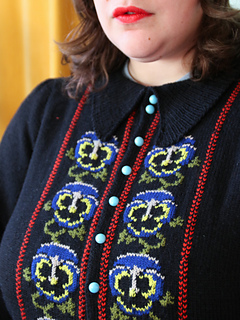
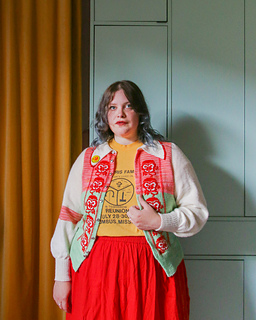
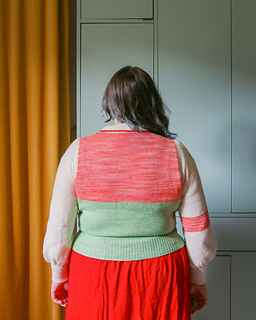
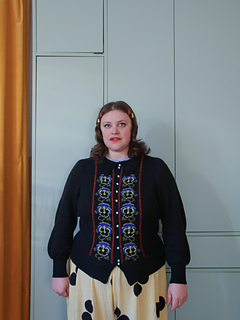
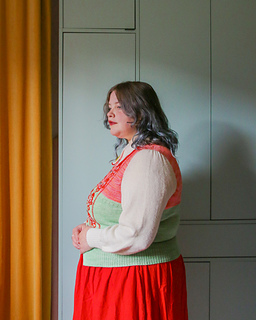
When I designed the Clamber Cardigan, I wanted to make something that would give you the feeling of stumbling upon a dream garment in your favourite vintage shop. Something impossibly cool and detailed and, get this, fits you like a glove! This cardigan takes its silhouette from the 1950s, with negative ease just underneath the waist, which grows into a comfortable amount of positive ease at the bust. The sleeves gently puff with ease on the outside of the arm for a silhouette that doesn’t effect your comfort. With eye catching design details like the highland-dancing-waistcoat-inspired V shape at the waist, and the oversized collar, the climbing pansy embroidery is framed beautifully for an eye catching final garment.
It is important to me that this pattern is financially accessible and so for low-income customers, this pattern can be purchased at 50% off using the code ‘LOW50’. This is an honours system - please respect that I also am trying to make a living from my designs and if you can afford the full price I’d appreciate if you paid it.
Starting at the waistband, the body is worked flat and joined at the shoulders with a Three Needle Bind-Off. The armholes are then picked up seamlessly to work in the round before seamlessly picking up the collar, which is worked flat and shaped using short-rows. This garment is made all in one piece for a satisfyingly smooth knitting experience, adding afterthought buttonholes once the piece is completely finished.
At the chest, the optional bust shaping short rows can be added to accommodate breasts. This pattern is graded using ‘women’s’ sizing charts but is designed with a wide variety of body shapes in mind. This style is totally unisex and should also fit a lot of cis men and other people who usually use ‘men’s’ sizing charts- please check the final measurements in the schematic. Despite having waist shaping, the pattern fits well on many body shapes, including folks with bigger waists.
After testing, we decided to add a few inches of ease, please bear that in mind when looking at tester photos.
Colourwork Considerations:
Yardage is shown for the plain base shown in black; a colour blocked version like the green, pink, and white one can be made using odd leftover yarns, I encourage you to use what you have!
The colourwork on this cardigan is designed to be worked using duplicate stitch embroidery (also known as swiss darning.) If, however, you prefer to use stranded colourwork or intarsia, you can feel free to use the colourwork charts on pages 36-39 and work them using your preferred method as you knit according to the pattern.
The pansy design is available in two scales so that it will fit on all sizes without being interrupted by the bust darts. Charts A & B work for all sizes but look visually a little small on sizes 7+, Charts C & D work from size 7 to size 11 and will only fit on smaller sizes if the bust darts are not worked.
The design is also available in both a linework version (Charts A & C) and full colour version (Charts B & D) to support different design styles. This is entirely decided by preference and how confident you feel working with colour! I often find that people who are less confident working with colour prefer to try something more simple.
Part of the reason I design for duplicate stitch embroidery is because it means the imagery on the jumper can be totally customisable and even designed on the spot! Please feel free to design your own embroidery pattern, or make the jumper entirely without embroidery at all!
Choosing a Size:
Choose the size that most closely matches your upper chest/upper bust* measurement: Sizes 1 (2, 3, 4) (5, 6, 7) (8, 9, 10) 11 will fit upper chest measurements of 67.5 (77.5, 85.75, 93.75) (102, 110, 118.25) (126.25, 134.5, 142.5) 147.5cm / 27 (31, 34.25, 37.5) (40.75, 44, 47.25) (50.5, 53.75, 57) 59in.
It is recommended to size up if you are between sizes, or want a less fitted garment.
- To measure your upper chest/upper bust measurement, place a tape measure around your body underneath your armpits at an angle and keeping arms relaxed at your sides.
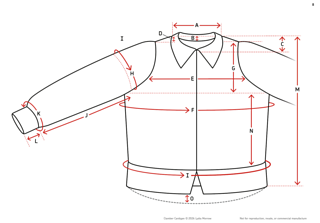
Finished Bust: 73.5 (83.5, 94, 103.5) (114, 124, 134) (144, 154, 164) 175cm / 29.25 (33.25, 37.75, 41.25) (45.75, 49.75, 53.75) (57.75, 61.75, 65.75) 70in
Intended positive ease at bust (the shaping will account for additional bust space requirements): 5 (4.5, 5.5, 4.5) (5, 5, 4.5) (4.5, 4.5, 4) 5cm / 2 (1.75, 2.25, 1.75) (2, 2, 1.75) (1.75, 1.75, 1.5) 2in
Intended negative ease at high hip (half way between waist and full hip): 5 (4.5, 5.5, 4.5) (5, 5, 4.5) (4.5, 4.5, 4) 5cm / 2 (1.75, 2.25, 1.75) (2, 2, 1.75) (1.75, 1.75, 1.5) 2in
Schematic illustration with complete measurements appears in pattern illustrations.
Choosing Shaping:
If you have breasts, a rounded chest or belly, or arched back, and often feel the front of your garments are shorter than the back, there is the option to work short row shaping over your chest to add length at the front only. This shaping is available in cup sizes 1 (2, 3, 4) 5, adding 3, (6.5, 9.5, 12.5) 16cm / 1.25 (2.5, 3.75, 5) 6.5in. The length added will be slightly less when worn due to stretch, so if you are between sizes, I would encourage you to size up.
Note that Cup 5 does not work for size 1 because there are not enough sts to support that number of rows.
Size 7 with Cup 2 is shown in the pattern photos and throughout the pattern on a model with an upper chest measurement of 123cm / 48in who usually wears a UK 24 / 26.
Yarn:
For my plain sample (shown in black) I used West Wool ‘bicycle’ (100% superwash merino wool), 400m / 437yds per 100g / 3.53oz)
For scrappy versions, you can use any fingering-weight merino or merino blend, whatever you have in your stash! I made my samples with various different brands of superwash merino and blends.
Gauge:
24 sts and 38 rows/rounds per 10cm / 4in in stockinette stitch worked both flat and in the round using 3mm / US 2.5 needle.
I suggest knitting one flat gauge swatch at least 6in / 15cm square as well as one swatch in the round in your Main Needle before knitting to check gauge. If there are more sts and/or rows than recommended in the gauge, you should size up your needles. If there are fewer sts/rows, you should size down. Gauge swatches are most accurate when blocked.
Supplies Needed:
- Tapestry needle
- 2 distinct stitch markers (can be made from a loop of waste yarn)
- 4 removable stitch markers
- Your desired number of buttons between 10mm and 15mm wide
- Blocking mat and pins if desired
Needles:
-
Main Needle - 3mm / US 2.5 or size needed to obtain gauge in your preferred lengths for small and large circumferences (I used 32in / 80cm.)
-
Sleeve Needle - 3.25mm / US 3 or size 0.25mm larger than Main Needle in your preferred lengths for small circumferences worked in the round (I used 30cm / 12in.)
-
Ribbing Needle - 2.5mm / US 1.5 or size 0.5mm smaller than Main Needle in your preferred lengths (I used 30cm / 12in.) For small circumferences worked in the round at the cuff, you can use magic loop, but I also used a sock needle (25cm / 10in).
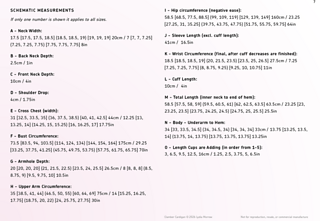
Yardage:
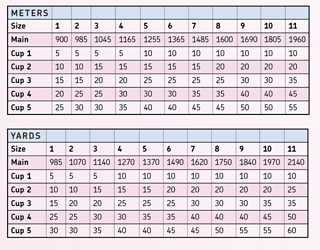
You can use the tables in the pattern photos to help you determine how much overall yardage you require for your knitting. Add your chosen cup (if relevant) to your main yardage, and add the relevant embroidery yardage to find your total yarn requirements.
For embroidery charts A & C allow 12m / 13.25yds for each flower.
For embroidery charts B & D allow 3m / 3.25yds per colour for each flower.
Size 7 with cup 3 has 10 flowers, the number of flowers depends on your sizing and shaping decisions and varies slightly from size to size.
Be aware that meters are shown above and yards below.
SPECIAL THANKS:
This pattern has been fully proof read and tech edited multiple times and had been tested in sizes 1-10. If you are size 11 and would like to provide tester-style feedback please contact me and I will refund the cost of your pattern.
I’d like to say a special thanks to the team who helped me put this pattern together. It was important to me to make the best pattern possible and it would have never been possible without the help of these guys:
Maria Suessmilch - Grading, technical consultation and additional support
@wildknitsglasgow on instagram
Heather Storta - Technical Editor
https://heatherstorta.com
Dave Morrow - Graphic design
@boxdog.inc on instagram
Antonia Verdier - Proofreading
@_neverghost on instagram
3133 projects
stashed 4366 times


